![]() Learn how to fix ‘cannot extend volume’ or ‘cannot shrink volume’ on Windows 10, Windows 8.1 or Windows 8 using third-party partition manager apps. Sometimes after adding a new volume or drive to Windows, there is the need to resize the volume. Especially, if you installed Windows 10 in dual boot with Windows 8.1 or 8, it can easily happen that you want to extend the Windows 10 volume and shrink the Windows 8.1 or 8 volume in return.
Learn how to fix ‘cannot extend volume’ or ‘cannot shrink volume’ on Windows 10, Windows 8.1 or Windows 8 using third-party partition manager apps. Sometimes after adding a new volume or drive to Windows, there is the need to resize the volume. Especially, if you installed Windows 10 in dual boot with Windows 8.1 or 8, it can easily happen that you want to extend the Windows 10 volume and shrink the Windows 8.1 or 8 volume in return.
Using Windows Disk Management utility, it often shows a grayed ‘Extend Volume…’ button meaning you cannot extend volume. The reason is that the unallocated space is on the left side and not on the right side of the volume you want to extend:
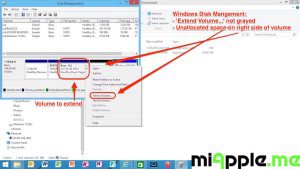
In Windows Disk Management you just can extend volumes which are on the right side / side behind:

If the ‘Shrink Volume…’ button is grayed, this means you cannot shrink volume. The reason for this it, that the volume you want to shrink is most likely fragmented.
The Windows Disk Management utility cannot handle these two problems, but third-party partition manager apps like EaseUS Partition Master free can do it. In principle, this tool works in the same way as the Windows Disk Management tool. However, it offers more features and is more flexible. For example, you can extend a partition / volume, regardless of where the unallocated space is placed.
Preliminary notes:
- Follow this instruction thoroughly to avoid piggyback installations of other EaseUS apps!
- Make a backup of your data before extending, shrinking or moving a partition!
Installation guide for EaseUS Partition Master free:
- Download the free version of EaseUS Partition Master free.
- Make a right-click on the downloaded file ‘epm.exe‘ and select ‘Run as administrator‘ to start installation.
- On the first installation screen select ‘Custom installation (advanced)‘ and do NOT select ‘Install PC Mechanic‘.
- On the second screen, deselect ‘Install EaseUS Todo Backup free‘ and click ‘Next‘.
- On the third screen, deselect ‘Install SuperPlusRadio v2.1‘ and click ‘Next‘.
- On the fourth screen, do not fill in ‘Name‘ and ‘Email‘ and click ‘Next‘.
- After installation has finished, start ‘EaseUS Partition Master free‘. On the start screen click on the symbol of ‘EaseUS Partition Master free‘.
Shrinking a volume / partition with EaseUS Partition Master free:
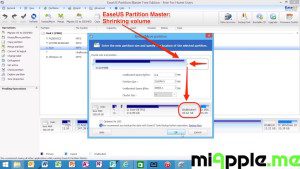
- Click on the volume / drive you want to shrink and select ‘Resize/Move‘.
- For shrinking the first volume, shift the bullet point to the left and click on ‘OK‘.

EaseUS Partition Master_01_shrinking volume on Windows 10, 8.1 and 8 - To make the changes come into effect, you must reboot your computer. Be aware that this process can take quite awhile because the entire volume has to be rewritten.
Extending a volume / partition with EaseUS Partition Master free:
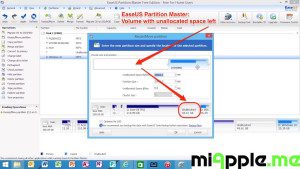
- Iftheunallocated space is on the left side of the second volume you want to extend, you have to move it to the right.

EaseUS Partition Master_02_volume with unallocated space left - For moving the second volume to the left, drag and drop the volume to the left.

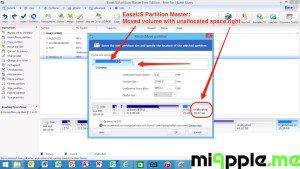
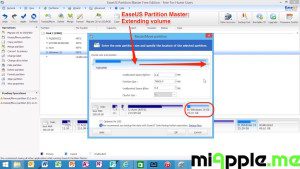
EaseUS Partition Master_03_moved volume with unallocated space right on Windows 10, 8.1 and 8 - For extending the second volume, shift the bullet point to the right and click on ‘OK‘.

EaseUS Partition Master_04_extending volume on Windows 10, 8.1 and 8 - To make the changes come into effect, you must reboot your computer. Be aware that this process can take quite awhile because the entire volume has to be rewritten.
After shrinking the first volume and moving and extending the second one, you can see the result in the volume overview.

The issues ‘cannot extend volume’ and ‘cannot shrink volume’ are solved by using a third-party partition manager like EaseUS Partition Master free. By installing the free version be aware of piggyback software installations.
Stay tuned! 😉


1 Comment
Fixing ‘Cannot Extend Volume’ Or ‘Cannot Shrink Volume’ On Windows 10, 8.1 and 8 http://t.co/GyxDr0nSRy