If your Mac has no admin account anymore or if your macOS account lost its administrator rights on macOS 10.14 Mojave, macOS 11 Big Sur or later, you can recover the macOS admin rights easily by running again Apple’s Setup Assistant tool to add a new admin account. For getting in the setup process, you have to remove the file “.AppleSetUpDone” via Terminal or macOS Recovery mode. Then, you can recover the admin rights of your original admin account via the new administrator account. After that, you can reboot into your recovered one and delete the interim admin account.
Note: The following fixes apply to macOS Mojave 10.14, macOS Big Sur 11 and later. For macOS High Sierra 10.13 and earlier, fixing Mac no admin account is solved via the “Command – S” (SUM = Single User Mode) route which is deactivate in later macOS versions: How To Recover Lost Admin Rights On macOS High Sierra and Sierra, Mac OS X El Capitan And Yosemite
The following fix “Mac no admin account” works if you lost admin account and admin rights
- during upgrading, e.g. from OS X 10.13 High Sierra to macOS Mojave 10.14 or to macOS Big Sur 11
- after restoring your Mac from backup, or
- after making heavy modifications to the system
The above mentioned situations can result in destroying or downgrading your admin account to a standard user account with no admin rights. In consequence, you cannot log in to your admin account or cannot use it for changing system settings.
Even though the Setup Assistant only runs once when you first install Mac OS X / macOS, it remains on your computer and is prevented from running by the presences of a hidden file called ‘.AppleSetupDone‘ in a system folder on your Mac. Therefore, to go through the Setup Assistant again you can create a fresh admin account, you simply need to remove this file:
Mac no admin account: How to recover admin rights by deleting .AppleSetupDone file via Terminal
- Open Terminal in macOS.
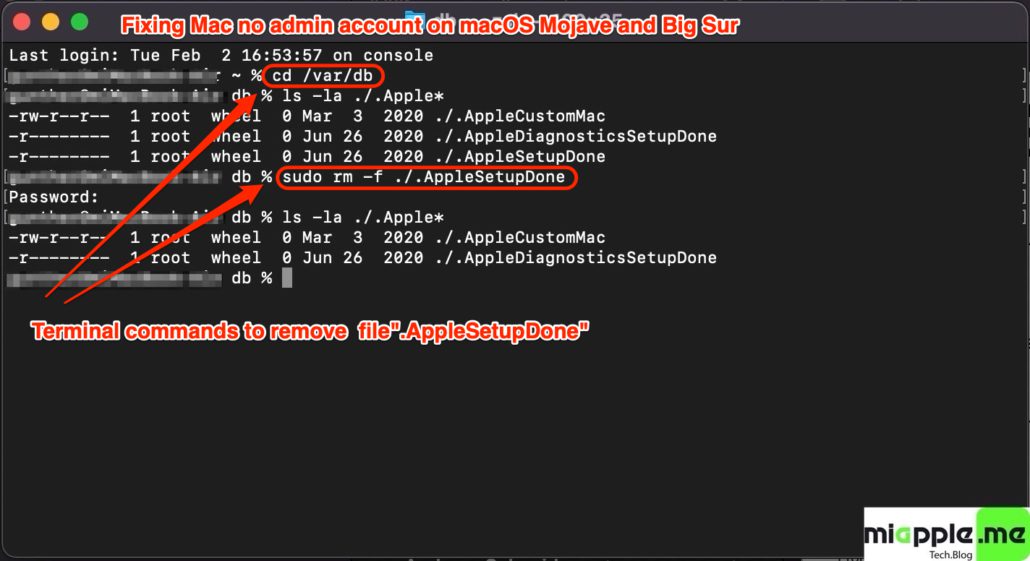
- Change the directory: Type cd /var/db and hit enter tab.
- Run the following command to remove file “.AppleSetupDone”: Type sudo rm -f ./.AppleSetUpdone and hit enter tab.
- Restart your Mac and go through the Setup Process. Create a new account and take a DIFFERENT username than your Standard user account (e.g. “Backup Admin”)
- After logging in, open System Preferences and select your Standard user account and check the box labeled “Allow user to administer this computer” (Note: if the box is grayed out, click the lock icon the lower left to enabled editing)
- Log out of your Mac and log in in as your original account.
- Either delete the Admin account you created in step 4 or, even better, leave it as a backup account.
Mac no admin account: How to recover admin rights by deleting .AppleSetupDone file via macOS Recovery Mode
- Shut down your Mac.
- Reboot your Mac and press and hold “Command + R“.
- At the “macOS Recovery”-Screen select a user, click on “Next” and enter the user’s password. Note: If you do not know the password click on “Forgot all passwords” and sign in with your Apple ID. This step is needed if you secured your Mac with FileVault.
- On the next screen select Disk Utility and mount all internal discs, especially “Macintosh HD – Data“.
- Close Disk Utility and open Terminal via selecting Utilities and then Terminal.
- At the prompt (in my case [-bash-3.2#]) type cd /Volumes/”Macintosh HD”/var/db and hit enter tab.
- Run the following command to remove file “.AppleSetupDone”: Type rm -f ./.AppleSetUpdone and hit enter tab.
- Then reboot your Mac: Type reboot and hit enter tab.
- Your Mac reboots. Go through the Setup Process. Create a new account and take a DIFFERENT username than your Standard user account (e.g. “Backup Admin”)
- After logging in, open System Preferences and select your Standard user account and check the box labeled “Allow user to administer this computer” (Note: if the box is grayed out, click the lock icon the lower left to enabled editing)
- Log out of your Mac and log in in as your original account.
- Either delete the Admin account you created in step 4 or, even better, leave it as a backup account.
Lost access to admin account on macOS 10.14 Mojave or later, can easily restored by reactivating Apple’s Setup Assistant tool through deleting the file “.AppleSetupDone” via terminal or macOS recovery mode. After rebooting your Mac or MacBook you walk through the process to set up a fresh administrator account with full admin rights.
Stay tuned! 😉
Pingback: How To Recover Lost Admin Rights On macOS High Sierra and Sierra, Mac OS X El Capitan And Yosemite - miapple.me
The instructions for doing this via Terminal don’t work, because sudo requires an admin account — and the lack of an admin account is the whole reason for going through this!
Hi, you need to read the instructions under “Mac no admin account: How to recover admin rights by deleting .AppleSetupDone file via macOS Recovery Mode“!
When I try to enter recovery mode it only lets me restart because “no administer account is associated with this volume.” How else can I do this?
Hi J,
try what Nigel suggested here in his comment.
Best regards,
Gee Are
When we type cd /Volumes/”Macintosh HD”/var/db,it shows no this file?
You have to use instead of „Macintosh HD“ the name of your Macs hard disk name!
what’s the name of HD,we just found the same name as Macintosh HD
Terminal doesn’t work because there are no admin users. When I enter recovery mode it says there are no admin users and only gives a restart option. Probably a good thing security-wise that this is difficult but what a pain! I will have to contact Apple support.
Hi Mary,
which Mac do you have, eventually one with an M1 chip? Which macOS is running on your Mac, Big Sur?
Best regards,
Gee Are
Mac no admin account instructions worked for me on Mac M1. Thanks!
Yeah worked for me too. No need to mount drives though as they are already mounted after booting into recovery. Also, once in the db directory I just ran rm .AppleSetUpdone
I can’t get to the set up process, gone through the steps using recovery, put each line in Terminal and didn’t say anything each line (put it in wrong a few times and it said doesn’t recognise or something) put reboot but then it just brings me back to the login screen, no setup process?
Hey there, I got most of the way through this process, but after trying to make the new account, the machine stops at the create-new-account screen; just sticks there with no resolution. I restart and the account is technically created but will not log in, and the recovery mode does not detect the account either.
My use case was downgrading from Monterey, in case you were wondering.
Hi Ernie,
please try the following:
If your Mac restarted because of a problem
How to reset the SMC of your Mac
Reset NVRAM or PRAM on your Mac
How to use safe mode on your Mac
Best regards,
Gee Are
Thank you this helped so much 🙏😊
Hello, does this delete the content in the computer?
Thank You.
Hi Carly,
no, it doesn’t!
Best regards,
Gee Are
thank you sooo much
You’re welcome! Thanks for your feedback!
hi i have macOs catalina. dont you have any way for me?
…macOS Catalina is the successor of macOS Mojave. This post is for Mojave or later. 😉
Cheers,
Gee Are
Thank you for this post! Monterey stalled during installation and I was forced to use internet recovery mode. That took forever, but did properly install Monterey. But then when I logged in I discovered that my administrator account had been stripped of its privileges. Ugh! I went through a half-dozen articles that were poorly written, did not work or both. I appreciated how clear your instructions were, but more importantly that it worked!
Thanks again.
Hi Jack,
thank you very much for your feedback and the confirmation that fixing Mac has No Admin Account is working on macOS Monterey, too.
Best regards,
Gee Are
Hi Jack, I’m in a similar situation. Which option worked for you? Terminal or recovery?
When I finished doing it, it gave me standard instead of admin. Any fixes?
Hi Aaron,
did you do it via Recovery Mode Method? If not, try this way.
Best regards,
Gee Are
Great job! Thank you this works fine on my Mac which just upgraded to Monterey.
I have been searching for all kinds of solutions they all told me to start the Singer-user-mode.
But this has been disabled after Mac OS 11.
This helped me a lot! Do you mind if translate this to Chinese and share it with the Chinese community?
Cause I don’t find any solutions in Chinese, I will refer to this page in the article.
Also apparently I post this comment on the other article you wrote, just ignore it 🙂
Again Thank you very much!
Thank you so much for this great article. I’ve been struggling for two full days, after installing Monterey the admin account was gone. The horror! I’ve tried a lot of things and nothing worked, until I stumbled across your tutorial!
So thank you so much, you saved my day!!
Hi,
I had the exact same issue after upgrading to Monterey. I was no longer able to change System Preferences or install new software because I would be asked for username and password. It SHOULD be the same password as you use to log into the computer, but alas, the computer doesn’t accept it. Kept giving me the shaking-because-you-have-the-wrong-password thang.
After a bunch of online research, I figured out that the issue is that my username was switched to be a “Standard” user, not an “Admin” user. So… effectively there was NO admin user on my account, thus no way to enter an admin username and password.
The solution is you need to trick the computer into running Setup Assistant again, so you can create a new user. That new user will automatically have admin rights. And then when you log in with that user, you can turn on admin rights for your original username.
I contacted Apple Support, and did a ton more research, and the steps everybody tells you to do are:
Re-start your computer in Recovery Mode, by holding down Command-R during boot-up.
Open Terminal
Type this command. Exactly, including spaces and quotes: rm “Volumes/Macintosh HD/var/db/.AppleSetupDone”
Then re-start your computer, and you’ll be taken into the Setup Assistant in which you can create a new user.
BUT: the problem for me was, it kept returning an error message in Terminal: “No such file or directory” And then I’d reboot, and no dice. Issue still there.
So…. more calls to Apple Support… and more research…. and through trial and error, this is what I figured out.
After going into Recovery Mode, I first went into Disk Utility. For some reason the volume listed as Macintosh HD – Data was showing as “unmounted”. So I simply hit the “Mount” button. And THEN I did the above steps, and it worked. Finally. Hallelujah.
It’s a major bug. If you’re having the same problem, and wanting to throw your computer out of the window, I get it. But hopefully this helps!
Apple, please fix in the next update! Thank you. Happy holidays.
Tried it on similar fashion same error No Such file Directory
Just worked for me on Monterey too. The key for me was to make sure to Mount the Macintosh HD – Data drive before typing in the Terminal commands. I had called Apple Support and they didn’t ask me to do that first and we couldn’t figure out why it wasn’t working. Thank you!
Hi Ross,
thank you very much for that feedback! Very helpful for all of us!
Best regards,
Gee Are
I was so hopeful that this was my answer. Ever since I upgraded to Big Sur, I do not have administrator rights. And looking at my Users and Groups doesn’t indicate that anyone does. I have followed the steps for both suggestions listed. On the first one, as soon as I restarted, it just took me back to my own username/password screen. (I can log into that without issue; it just doesn’t consider me an administrator). On the second one, I was hopeful but I was stuck on the 2nd step…it didn’t even give me a place to “log in”. I did go ahead and follow the steps but again, when I typed reboot, it just took me back to my own username. I have talked to 3 people in apple support. Nothing is working. 🙁 I can’t even change the time on my own computer. I was told my computer is “vintage” so I have to make another trip to an Apple store for further help. (I just had my Macbook battery replaced too). I am just so frustrated!
Hi Rebecca,
many thanks for you’re detailed feedback!
Please, try this wirh your vintage Mac: https://miapple.me/how-to-recover-lost-admin-rights-on-os-x-10-11-el-capitan-and-10-10-yosemite/
Another Option:
– Make a complete Time Machine Backup of your Mac and a second one where you just copiy your personal files
– Reinstall your Mac
– Make a new time machine backup
– then make a recovery with the first ™ Backup
– if this does not work, use the second one and copy your personal files there
Hope one of these tipps helps!
Best regard,
Gee Are
Thank you for this post. This is the only thing that worked for me. I lost my admin account after updating to Monterey (felt like a big mistake to update). Not a single command in multiple articles worked, kept on getting errors such as file not found. I followed the steps outlined by you via the recovery mode (terminal one did not work for me) and voila I got my admin account back. I am never going to update my software again. Thank you so much!!
You’re welcome!
Hello! Successfully recovered admin rights for my partner’s MacBook Air using MacOS Recovery Mode method. Very grateful for your clear instructions which even a novice could follow! Thank you so much.
You’re welcome! Which macOS is your MacBook running?
Hi Sue,
great to hear that! Many thanks for your feedback!
Best regards,
Gee Are
The 2nd option worked for me today on my vintage (Late 2014 iMac 27″) Mac when my Big Sur install downgraded my account from administrator to standard.
It puzzles me that it didn’t work for REBECCA J CLOUD – our situations seem nearly identical. Since your tips and other’s experiences were a lifesaver for me (I was about do the “Another Option” full reinstall from your January 12, 2022 at 06:58 post), I’ll detail my experience – especially since I did a slight variant at step 6 of your second method.
I have a late 2014 iMac (5K, 27″). It all started last night when I ran the upgrade from the latest version of Mohave to the current version of Catalina. Afterwards, the computer only got halfway through booting – stayed with a black screen and white Apple logo, half-thermometer bar, overnight. I did the Mac Recovery mode, used Disk Utility to run Disk First Aid on the two HD partitions, and tried rebooting again. No joy. The only reinstall option offered in Mac Recovery was Big Sur, so I ran that. After a couple hours, all seemed well, but after logging into Big Sur I found my main admin account was now a standard account, and in fact, I had no admin accounts on my machine at all. ( I think I’d given admin privileges to my Plan B” account, too.)
After Googling around, and trying some tips that worked on older OS’s, I found this page. I tried the first method (“Terminal”) only to find out that the pertinent command (“sudo”) now requires a password. So, no joy there.
I then tried the second method (Apple Recovery Mode). At step six, I did get the prompt: [-bash-3.2#
Your “cd” command didn’t work for me (likely because I typed something wrong), but I’m reasonably fluent in Unix, so I poked around to confirm the file was there. Based a tip from another website, I started over, and at step six, in response to the prompt: [-bash-3.2# , I entered:
rm “/Volumes/Macintosh HD/var/db/.AppleSetupDone”
photographed the screen for reference, and hit the Return key on my keyboard.
(The capitalization I used for “AppleSetupDone” matches your screenshot above, not the text instructions – I don’t know if that matters, but it certainly seemed safer to use the capitalization I saw on the screen.)
That worked. I then quit the terminal, and followed the rest of your steps. Worked fine.
Thanks!!!!
My 2016 15” MBP crashed during updating to Monterey 12.5 and all my administrators reset to standard accounts once i finally got it installed. This version of the instructions worked for me. The trick was the / before Volumes in the rm… command line, no one else in this thread had it! Also, and this might be obvious to some (but not me), substitute the name of your SSD for the phrase ‘MacintoshHD’ (in my case ‘Richard’s MBP’).
My SSD was mounted in Disk Utility but (on about the 10th try) i un-mounted it and the mounted it again before running the above Terminal command. Nit sure if this made a difference or not to be honest.
Thanks all, time for a nice glass of red to celebrate!
Hi Richard,
many thanks for your feedback and the additional information for macOS Monterey!
And for the glas red! 😉
All the best,
Gee Are
thank you Richard, after many attempts the slight changes to code, you suggest here, solved the issue for me; my macbook’s about same age as yours btw
Big Sur Macbook Pro M1. Tried removing .AppleSetupDone and .AppleDiagnosticsSetupDone (both singularly and together). After reboot, it appears like new setup if taking place. Selected the language, then on to Wifi settings. Once I select my Wifi and click next, the screen goes black, then loads the original log in screen. No new admin account created.
Not sure if this helps, when I’m in Terminal and enter: “cd /Volumes”, then “ls -l”, returns these volumes:
Data
Image Volume
Preboot
ScondaryOSX
macos Base System
Do you know why I can’t add a new account through this method?
Hey the MacOS Recovery mode method worked like a charm! Thank you so much for the help getting an Admin account back on my mac!
You’re welcome! Great! Thanks for your feedback!
Hi. im battling the same issue.
former employee left, i wanted to set up the macbook air m1 for the new employee, but ended up with no admin profile, which is preventing me from installing the OS (Big Sur 16.2.01 (16201)). i tried all steps in this thread with no result:
Type cd /var/db and hit enter tab. -> next line appears: -bash-3.2#
Run the following command to remove file “.AppleSetupDone”: Type sudo rm -f ./.AppleSetUpdone and hit enter tab. : sudo: command not found
so then i try
rm “Volumes/Macintosh HD/var/db/.AppleSetupDone” -> No such file or directory
rm “/Volumes/Macintosh HD/var/db/.AppleSetupDone” – No such file or directory
Disk is mounted (as per Ross Babbit comment)
when I try to install the OS, accept T&C, click next, select Macintosh HD as destination of instal and click next, I keep getting an error (no user for authorization – ensure that there is at least 1 admin profile). when computer restarts, the boot bar gets 1/3 way through, resets, does that a few times, then I end up on the Apple ID verification, when I verify with the Mac’s associated ID, I end up at the recovery screen and I’ve been stuck in this loop for a while now. Any suggestions?
So. hope the following information works for others. I ran into this issue with an iMac is was setting up for my Grandson. The iMac in question is a 2013 model 21″ with High Sierra. I wanted to change the name of the Admin account-and thats how somehow the Admin account became a ‘standard’ account.
The key problem is that if you try to remove the setup file in single user mode you can’t. and if you try to remove it in recovery you can’t. mostly due to it not being there.(/var/db). You can discover where it is by revealing all the invisible files on your computer(shift+command+.) at the hard drive level you will find the folder ‘var’ but it is an alias-if you follow the alias you will see it is at /private/var/db. So if you reboot into recovery mode and follow the instructions above you should be able to remove the file. I additionally before trying to remove disbabled integrity
csrutil disable
and made sure the disk was mounted
mount -uw /dev/disk1s1
after doing a cd /private/var/db
I did an LS to see the list of files
then did the RM
rm -f ./.AppleSetUpdone <-note not using SUDO
then did an LS again to see that the file was gone
then reboot to get to setup
Hope this helps someone
Thank you so much you really saved me from lots of headaches. I have 2 a 2014 MacBook Air i5 4g and I updated from Mojave to Big Sur 11.6.4.
The 2nd option through recovery worked for me after many trials , because I made a few errors when typing the commands .
One more pointer ; after typing “Reboot” , the computer reboots to original account , so I had to shut down completely before trying to login.
I shut down completely after the reboot and it gave me the option to set up a new admin account.
Hi Tika,
Thank you very much for your detailed feedback! This will help others for sure!
Best regards,
Gee Are
This worked for me, many thanks. Lost my admin privileges when upgrading to BigSur, now back. Cheers
You’re welcome!
Thanks a lot for your great tutorial. Updated Macbook Air 2015 von High Sierra auf Big Sur. Via Recovery Mode i created as described a new admin user and all was working fine! Had a lot other similar but always got no such directoy. going into the directory in your guide helped to fix it. Crazy that is a bug from apple which has never been fixed properly.
Many thanks for your feedback!
The process worked but when I open the files in my old account nothing is there 😢
Help
Omg, thanks for the advice, but it didn’t worked for me. I have Macbook air early 2014. I installed macOS Big Sur version 11.6.5
I did all the steps. I tried all versions. Nothing helps. I can’t even fix the time zone. I have been stripped from my rights in my only cumputer. I do all my work here and it is frustrating. I regret have done the installation of this system. If you could help me please contact me.
Liz
I was able to set up another admin account (THANK YOU!!!!) but my standard user account does not appear in system preferences under ‘User & Groups’. Luckily I can see my standard user files when I look at the path bar for the hard drive in finder. It is on there and I can open many of the files that way. So that is progress. Is there a next step I can use to get my Standard User account to appear as a log on option in the system preference screen? I feel like I am almost there. There is some data I have in Notes I need from my Standard account that I haven’t ben able to access in the Backup Admin….so close.
That’s wired! Maybe you do it again with another admin account. Let give it a try!
I ended up uncloaking the hidden library files from the original account and copy and pasting group.com.apple.notes folder into the cloaked Container file on the the BACKUP ADMIN account. That gave me my notes that hadn’t synchronized back. I am happy about that because even if trying the original steps over is unsuccessful, I can just copy all my original folders onto to the Backup admin including the cloaked ones without losing data. Thank you again. Your tutorial got me going. Time machine has a lot of my data but there were just a few things from the past week that hadn’t backed up and fixing it was worth its weight in gold compared to doing it over.
Great, it all worked out! Thanks a lot! Just one addition for Ventura: to get to Terminal in recovery mode, you have to go through the step of changing the password for your regular entry, even if you remember the old one. Hint: you can make the new password the same as the old one.
Hi Harry,
great to working on macOS Ventura. Many thanks for the hint!
All the best,
Gee Are