
![]() If your Mac has no admin account anymore or if your macOS account lost its administrator rights on macOS 10.14 Mojave, macOS 11 Big Sur or later, you can recover the macOS admin rights easily by running again Apple’s Setup Assistant tool to add a new admin account. For getting in the setup process, you have to remove the file “.AppleSetUpDone” via Terminal or macOS Recovery mode. Then, you can recover the admin rights of your original admin account via the new administrator account. After that, you can reboot into your recovered one and delete the interim admin account.
If your Mac has no admin account anymore or if your macOS account lost its administrator rights on macOS 10.14 Mojave, macOS 11 Big Sur or later, you can recover the macOS admin rights easily by running again Apple’s Setup Assistant tool to add a new admin account. For getting in the setup process, you have to remove the file “.AppleSetUpDone” via Terminal or macOS Recovery mode. Then, you can recover the admin rights of your original admin account via the new administrator account. After that, you can reboot into your recovered one and delete the interim admin account.
Note: The following fixes apply to macOS Mojave 10.14, macOS Big Sur 11 and later. For macOS High Sierra 10.13 and earlier, fixing Mac no admin account is solved via the “Command – S” (SUM = Single User Mode) route which is deactivate in later macOS versions: How To Recover Lost Admin Rights On macOS High Sierra and Sierra, Mac OS X El Capitan And Yosemite
The following fix “Mac no admin account” works if you lost admin account and admin rights
- during upgrading, e.g. from OS X 10.13 High Sierra to macOS Mojave 10.14 or to macOS Big Sur 11
- after restoring your Mac from backup, or
- after making heavy modifications to the system
The above mentioned situations can result in destroying or downgrading your admin account to a standard user account with no admin rights. In consequence, you cannot log in to your admin account or cannot use it for changing system settings.
Even though the Setup Assistant only runs once when you first install Mac OS X / macOS, it remains on your computer and is prevented from running by the presences of a hidden file called ‘.AppleSetupDone‘ in a system folder on your Mac. Therefore, to go through the Setup Assistant again you can create a fresh admin account, you simply need to remove this file:
Mac no admin account: How to recover admin rights by deleting .AppleSetupDone file via Terminal
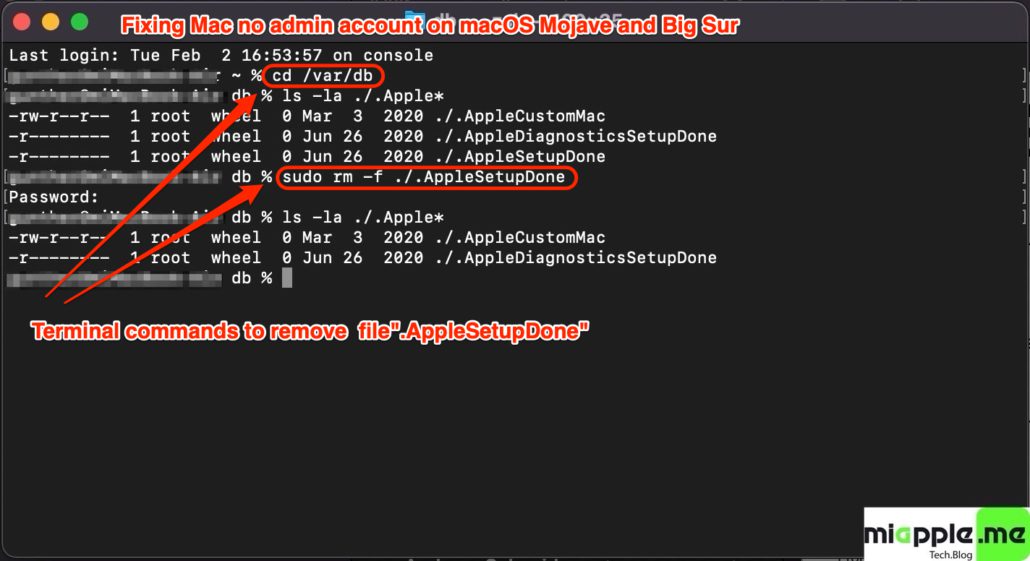
- Open Terminal in macOS.
- Change the directory: Type cd /var/db and hit enter tab.
- Run the following command to remove file “.AppleSetupDone”: Type sudo rm -f ./.AppleSetUpdone and hit enter tab.
- Restart your Mac and go through the Setup Process. Create a new account and take a DIFFERENT username than your Standard user account (e.g. “Backup Admin”)
- After logging in, open System Preferences and select your Standard user account and check the box labeled “Allow user to administer this computer” (Note: if the box is grayed out, click the lock icon the lower left to enabled editing)
- Log out of your Mac and log in in as your original account.
- Either delete the Admin account you created in step 4 or, even better, leave it as a backup account.
Mac no admin account: How to recover admin rights by deleting .AppleSetupDone file via macOS Recovery Mode
- Shut down your Mac.
- Reboot your Mac and press and hold “Command + R“.
- At the “macOS Recovery”-Screen select a user, click on “Next” and enter the user’s password. Note: If you do not know the password click on “Forgot all passwords” and sign in with your Apple ID. This step is needed if you secured your Mac with FileVault.
- On the next screen select Disk Utility and mount all internal discs, especially “Macintosh HD – Data“.
- Close Disk Utility and open Terminal via selecting Utilities and then Terminal.
- At the prompt (in my case [-bash-3.2#]) type cd /Volumes/”Macintosh HD”/var/db and hit enter tab.
- Run the following command to remove file “.AppleSetupDone”: Type rm -f ./.AppleSetUpdone and hit enter tab.
- Then reboot your Mac: Type reboot and hit enter tab.
- Your Mac reboots. Go through the Setup Process. Create a new account and take a DIFFERENT username than your Standard user account (e.g. “Backup Admin”)
- After logging in, open System Preferences and select your Standard user account and check the box labeled “Allow user to administer this computer” (Note: if the box is grayed out, click the lock icon the lower left to enabled editing)
- Log out of your Mac and log in in as your original account.
- Either delete the Admin account you created in step 4 or, even better, leave it as a backup account.
Lost access to admin account on macOS 10.14 Mojave or later, can easily restored by reactivating Apple’s Setup Assistant tool through deleting the file “.AppleSetupDone” via terminal or macOS recovery mode. After rebooting your Mac or MacBook you walk through the process to set up a fresh administrator account with full admin rights.
Stay tuned! 😉
64 Comments
well im facing a difficulty after completing up to step 9 when I reboot through terminal it doesn’t give me the setup process am I doing something wrong or missing something . my MacBook is running on Ventura .thanks in advance
To get to Terminal in recovery mode in Ventura, you have to go through the step of changing the password for your regular entry, even if you remember the old one. Hint: you can make the new password the same as the old one.
Great, it all worked out! Thanks a lot! Just one addition for Ventura: to get to Terminal in recovery mode, you have to go through the step of changing the password for your regular entry, even if you remember the old one. Hint: you can make the new password the same as the old one.
Hi Harry,
great to working on macOS Ventura. Many thanks for the hint!
All the best,
Gee Are
I was able to set up another admin account (THANK YOU!!!!) but my standard user account does not appear in system preferences under ‘User & Groups’. Luckily I can see my standard user files when I look at the path bar for the hard drive in finder. It is on there and I can open many of the files that way. So that is progress. Is there a next step I can use to get my Standard User account to appear as a log on option in the system preference screen? I feel like I am almost there. There is some data I have in Notes I need from my Standard account that I haven’t ben able to access in the Backup Admin….so close.
That’s wired! Maybe you do it again with another admin account. Let give it a try!
I ended up uncloaking the hidden library files from the original account and copy and pasting group.com.apple.notes folder into the cloaked Container file on the the BACKUP ADMIN account. That gave me my notes that hadn’t synchronized back. I am happy about that because even if trying the original steps over is unsuccessful, I can just copy all my original folders onto to the Backup admin including the cloaked ones without losing data. Thank you again. Your tutorial got me going. Time machine has a lot of my data but there were just a few things from the past week that hadn’t backed up and fixing it was worth its weight in gold compared to doing it over.