![]() Windows 10 dual-boot with Windows 8 or Windows 8.1 is easily set up having a second partition on your Windows PC and a bootable USB flash drive with the Windows 10 ISO file on it. If you do not want to risk to install Windows 10 technical preview on your working Windows PC, Windows 10 dual-boot is an alternate good option compared to installing Windows 10 on a virtual machine using VirtualBox.
Windows 10 dual-boot with Windows 8 or Windows 8.1 is easily set up having a second partition on your Windows PC and a bootable USB flash drive with the Windows 10 ISO file on it. If you do not want to risk to install Windows 10 technical preview on your working Windows PC, Windows 10 dual-boot is an alternate good option compared to installing Windows 10 on a virtual machine using VirtualBox.

Here’s the Geeks’ quick ‘How-to’ set up Windows 10 dual-boot with Windows 8:
- Create a second partition / bootable drive on your Windows PC. Minimum requirement is a 20 GB free disk space for installing Windows 10 (technical preview).
- Make a bootable USB flash drive with the Windows 10 ISO file on it. Minimum requirement is a 4 GB USB drive for the 32 bit version or a 8 GB USB drive for the 64 bit version.
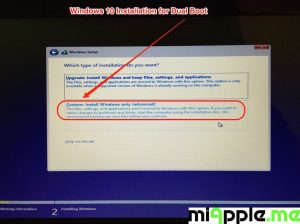
- Install Windows 10 from your bootable USB flash drive following the instructions, especially choosing ‘Custom: Install Windows only (advanced)‘ and select another, free partition of your PC (the one you created in step 1.). After that you will have a dual-boot option while starting your Windows PC.
Here’s the detailed ‘How-to’ for ‘non-Geeks’: 🙂
Step 1: Create a second partition / bootable drive on your Windows PC
Note: If you already have a free partition with minimum 20 GB free disk space available for Windows 10, you can skip the instructions of ‘Step 1‘ and begin with ‘Step 2‘.
- Minimum requirement is a 20 GB free disk space for installing Windows 10 (technical preview).
- Follow the instructions described in the post “How To Resize, Shrink And Add A Drive To Windows 8 Or 8.1“
Step 2: Make a bootable USB flash drive with the Windows 10 ISO file
- Take a USB stick / USB flash drive: Minimum requirement is a 4 GB USB drive for the 32 bit version or a 8 GB USB drive for the 64 bit version.
- Follow the instructions described in the post “How To Install Windows 10 From A Bootable USB Flash Drive“.
Step 3: Install Windows 10 from your bootable USB flash drive
- Boot your USB drive. You may need to hit a special key such as F11 or F12 as soon as your computer starts in order to select your boot device.
- Click ‘Next‘, leaving the language, time and keyboard settings intact.
- Click ‘Install Now‘.
- Accept the license terms and click ‘Next‘.
- Select ‘Custom: Install Windows only (advanced)‘.
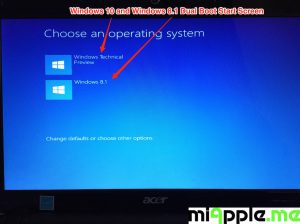
- Select the partition you just created, which may be marked as ‘unallocated space‘. Click ‘Next‘. Windows will take a few minutes to copy files. After a few minutes, the system will restart and display a boot menu.
- Select ‘Windows Technical Preview‘. This system will copy more files and then reboot again.
- Select ‘Windows Technical Preview‘ a second time, after the system rebooted.
- Click ‘Use express settings‘.
- Sign in to your Microsoft account or create a new one.
- Verify your account by entering your email address and then put in the code that Microsoft emails to you.
- Select ‘Set this up as a new PC instead‘, so you can experience a fresh, default install of Windows 10. Click ‘Next‘.
- Click ‘Next‘ to activate OneDrive on Windows 10.
- Windows will take a few minutes finalizing your settings. Then you’ll see the desktop and you’re done.
The next time you boot your PC, you’ll be presented with the same boot menu and given the choice of starting your old version of Windows or Windows 10 Preview.
Now you have a Windows 10 dual-boot with Windows 8 or Windows 8.1 on your Windows PC and you can test Windows 10 technical preview, e.g. you can install iTunes 10 on Windows 10 and enjoy it! 🙂
Stay tuned! 😉


3 Comments
Pingback: Plex Media Server Running On Windows 10 - miApple.me
Pingback: SyncToy 2.1 Compatible With Windows 10 - miApple.me
Pingback: How To Uninstall Windows 10 Dual Boot - miApple.me